A Roadmap to a Hall-of-Fame Forehand - Part 4: Introduction to the Functional Anatomy of Optimal Tennis Performance
In our previous post titled, “A Roadmap to a Hall-of-Fame Forehand – Part 3”, we suggested that anatomical terminology is far more useful in describing and explaining the movements used by players to execute their various strokes.
We’ve found that using highly precise, widely-accepted and understood anatomical terms is more effective in teaching players about stroke mechanics compared to using the overly-simplistic and easily-misunderstood tennis-specific jargon such as – “wrist layback”, “windshield wiper”, “hit in the slot”; “double-bend structure”, etc. –that dominates the current stroke instruction vocabulary used by players, teachers and coaches alike.
This way, we would finally have a common language – a common terminology that would also be easily understood by doctors and physical therapists in the case, heaven forbid, when tennis somehow leads to injury – to describe the stroke mechanics used by any and all tennis players.
In stark contrast to the fundamentally over-simplified, imprecise and confusing jargon, anatomical terms like “abduction”, “rotation”, “pronation” , “supination”, etc. have very precise meanings which then provide you with far more precise instruction to help you (re-)produce the exact movements you need to increase your racquet speed, the amount of topspin you can generate, the trajectory of your shot, etc.
In this post, we’ll introduce a visual, “anatomical” map of the movements Federer uses to execute his forehand.
In other words, what we’re presenting here is the “functional anatomy” of Roger Federer’s forehand.
Before we really kick things off, let’s make two important points here:
- because we are looking at still images of what is actually “in motion”, what we are really doing with those labels is identifying the type of (joint) movement that was used to achieve the static position that you see “freeze-framed” at each stage of the stroke.
- because we are looking at “freeze-framed” events, you need to realize that the body positions you see are not always “static” positions. Rather, a given position you see may be “motion-dependent”—where the pictured position is the result of moving the arms (or legs) in a particular way.
So, the “back-scratch” movement you see is really a position-in-motion.
Therefore, you can’t reproduce it (or its intended result) by “posing” in that static position then “resuming” the rest of the stroke movements from that point.
Therefore, you can’t reproduce it (or its intended result) by “posing” in that static position then “resuming” the rest of the stroke movements from that point.
Finally, we’ll save any discussion of the labeled movements for later posts.
For now, let’s focus on becoming familiar with correctly identifying the movements we see in any still image stroke analysis using the correct terminology…
1. The Ready Position
2. Breaking the Triangle
3. Completed Backswing
4. First Forward Move (FFM)
5. 20 frames (95.2 milliseconds) before Impact
6. 10 Frames (47.6 milliseconds) Before Impact
7. Impact
8. 5 Frames (23.8 milliseconds) after Impact
9. Follow-Through - Hands at Shoulder Height
10. End of Stroke
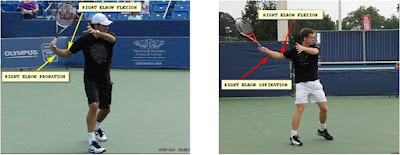
Now, to end this post, let’s compare the “anatomical map” of Roger’s forehand at certain key stages with the map of one of his less-successful contemporaries, Andy Murray.
Before we see the evidence, how similar or different do you think the forehand mechanics between these two players might be? Are the differences subtle or “obvious”, and are the consequences of those differences small or large?
At this point, we’ve spent considerable time trying to sort out the answers to questions like these, and what we’ve found out it that the answers are mostly 180 degrees-opposite of what’s accepted and blindly followed and repeated today.
Maybe what’s more worrisome (but not surprising) is that most coaches, teachers and internet gurus don’t even know what questions they really need to ask to help their players achieve higher performance – at least in terms of stroke mechanics. (Kinda goes back to my example of expecting that your car mechanic can clean your teeth with the same competence and skill as a trained dental hygienist).
Let’s now take a look at the Federer and Murray forehands side-by-side, at five (5) key stages of the stroke: 1) the Completed Backswing; 2) at FFM, 3) at 10 frames before Impact; 4) at Impact; and, 5) during the Follow-Through at the point when the racquet hand reaches shoulder height.
Labels: Andy Murray, forehand, functional anatomy, high performance tennis, Roger Federer, tennis, tennis stroke mechanics


